I want to add drawers to the workbench I built for my Shapeoko CNC router. I’ve never made any so I’ve been trying to learn as much as I can so I don’t make any expensive mistakes. If you’ve never added drawers to a workbench and might want to, then watch the video above. It’s one of the best ones I’ve found.
I’m going to use 1/2-inch Baltic plywood for everything — the drawer sides, the drawer bottoms, and the frame. In case you’re wondering, 4×8-foot sheets currently sell for $45 at Home Depot. And ten pair packs of medium-duty self-closing full-extension drawer slides cost from about $60 to $110 on Amazon, depending on the length, for ones that are both popular and highly rated. This project will use eight pairs and I’m probably going to use these. [I did almost everything in this paragraph differently. This update will tell you why.]

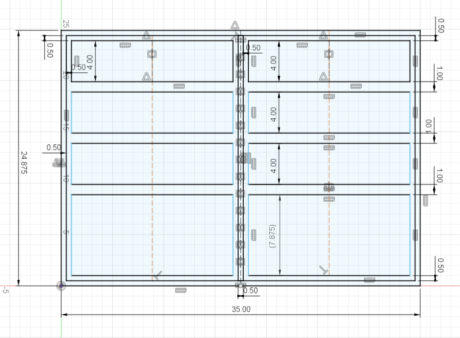
One thing I’m still unsure of is how deep (not high) to make the drawers. The opening in the workbench where the drawers will go is 35-inches (wide) x 25 (high) x 30 (deep). There are 22-inch long drawer slides, so I could make the drawers that deep. But should I?
Maybe I shouldn’t turn down extra storage space, but it seems like 18-inches will be deep enough. The drawers of my rolling steel tool cabinets are 16-inches or less.
I know that drawer boxes made with dovetail joints are the strongest. But it looks like you can also build durable drawers with pocket screws and glue. That method is much easier and faster and I’ve got other projects to work on, so that’s how I’m going to make mine. If I make the drawer sides with my CNC router then I may add some slots and tabs which will increase their strength and help with their assembly.
All the parts could be made with my CNC router except for the sides of the frame, which are too big. But, I’m not sure I’m going to use it.
The drawer sides and bottoms will get cut more precisely with the CNC router because I’ll be making them with a circular saw if I don’t. However, the CNC will take much longer to cut the parts out and it will waste more wood. It’ll also take time to CAD and CAM the parts, but I want the practice.
I really like the video above. It shows you how to size the drawers for your opening, how to make the drawers, how to space and mount the drawer slides, and how to attach the drawer fronts with an even gap around them (using playing cards!). And it shows you how to do it all without having to purchase any special jigs or tools.
If you have any advice for me I’d like to hear it. Please tell me in the comments.
Don’t use pocket holes, they aren’t as strong as other methods, dovetails / box joints.
Watch Mattias.
https://www.youtube.com/watch?v=ADN5JK6K8IM
Cheers
Andrew