This is the last article in Mikey’s series about grinding lathe tool bits. In part 1 he discussed his experiences with grinding bits, why he uses a belt sander instead of a bench grinder and introduced some terminology about tool bit shapes and angles. In part 2 he covered tip geometry and tool shapes in more depth. Here he describes the actual process of grinding a tool bit.
Grinding a tool
ALWAYS wear eye protection, hearing protection, a dust mask and leather gloves when grinding. No tool is worth sacrificing your body parts.
Remember, no angle works in isolation
Think about what you need with regard to shape, strength, tip access, and the type of material(s) you will use the tool on. Choose your relief and side rake angles and when you are clear on what you intend … just grind it that way. This thought process is illustrated below.
Let’s grind a general purpose right hand tool from a 3/8†HSS blank that should work with steel, aluminum, plastics and stainless. It is not optimized for any of these materials but should work fairly well with all of them. You can rough, face and finish by varying the lead angle of the tool. By choosing a general shape for multiple materials we need to think about the compromises these choices force on us:
- The overall shape will be half-way between a rougher and a facing tool. To allow this tool to face into a shoulder we’ll give it an end cutting edge angle of 80- 85 degrees. This more acute angle reduces tip strength a little but is of no concern on a small lathe even when roughing, though it does add to the equation.
- To reduce cutting forces we will use a conservative side relief angle of 15 degrees and a more aggressive end relief angle of 15 degrees; both changes will improve facing, finishing and edge penetration. In addition to turning you can also use this tool for chamfering with the side and end.
- Since I am losing some strength by using greater angles for side and end relief as well as from that more acute end cutting edge angle, I’ll try to conserve some strength and compromise chip clearance a little by keeping the side rake conservative at 15 degrees. Back rake is at the high end of the standard range at 15 degrees to further assist the side rake in improving chip clearance; it also boosts finishing potential.
- We’ll use a nose radius between 1/64†and 1/32†to allow a deep cut while still giving a fair finish.
- A LH tool is the same except the shape is reversed.
As you can see, multi-purpose tools require some compromise. I have given more emphasis to tip strength because we will also be using this tool for roughing, which creates large cutting loads in harder materials. We’ll discuss this further in the End Notes.
General Advice:
- If you are new at this I suggest practicing on mild steel key stock from the hardware store, not HSS. It grinds easily and is cheap. Just cut it to the same size as your HSS blanks so you get a feel for handling a bit.
- Let the belt cut; you want to use only moderate pressure – enough to keep the belt cutting continuously – and keep the tool moving back and forth across the entire width of the belt. The steel will show you some color to indicate how hot it is getting. HSS can get into the low red range without compromising the steel but if I see anything beyond dark straw I know I am using the wrong grit, my belt is worn or I’m putting too much pressure on the tool when grinding. It the tool gets too hot to hold let it air cool or just set it down on a brick – it cools fast.
- The usual sequence I follow when grinding a tool is to cut the side first, then the end, followed by the top. This isn’t written in stone. You can grind the top face first to ensure the top and side cutting edges meet exactly at the edge as they should – think about it.
Seen below is my grinding setup. It is a ½ HP Craftsman 2†X 42†belt sander with a custom steel table settable to precise angles. The platen is a 2â€W X 9†L X 1/4†thick piece of O-1 ground steel to which a Pyroceram liner is epoxied; it is dead flat after years of frequent hard use. It is equipped with a 24 grit Aluminum Oxide belt, soon to be coated with a wax stick lubricant. This belt cuts very fast and very cool when using only light to moderate pressure applied toward the belt and I highly recommend it for shaping. Just ease up on the pressure as you near the end of the grind to eliminate coarse grind marks. After shaping, you can change to progressively finer grits and produce a near mirror finish if you choose.
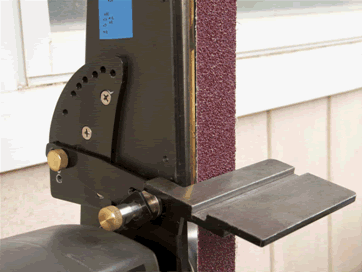 The table is set to 15 degrees to cut the side relief angle, the vertical angle under the side edge. The side cutting edge angle is determined by the angle with which you present the tool to the belt; as you grind it you are grinding the side relief angle at the same time. For this tool the side cutting edge angle is approximated so that 60% of the side is ground off when I am done. If I want a rougher I grind 40% off the side, 70% for a facer and 80% for a finisher.
 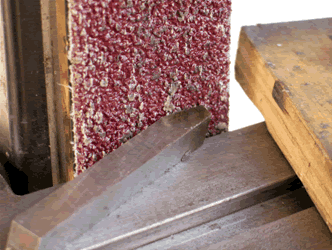 The block of wood in the picture above backs the tool while grinding; one hand holds the block to maintain moderate pressure into the belt as the tool is moved side to side across the belt with the other hand. Be sure to relax your hands and sight along the top of the tool where it meets the belt; keep that edge parallel to the belt to help you maintain your cutting angle and prevent facets from forming. Don’t rush the grind – take your time and work safely.
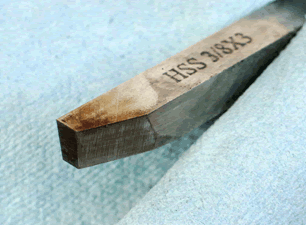 Note the dark straw discoloration after grinding the side; this is about 490 degrees, which is less than half of the way to barely red hot. The tool cut readily in about 2 minutes and cooled after grinding this face in about a minute. (I suggest re-applying wax before each face is ground.)
 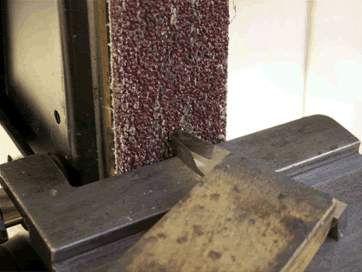 Next we cut the end cutting edge angle. I am using the same 15 degree table angle so the end relief angle, the vertical angle of the tool under the end edge, will be 15 degrees. I am presenting the tool to give me an 80-85 degree end cutting edge angle relative to the side cutting edge angle. For this cut the block is used to move the tool side-to-side while my other hand applies pressure into the belt. When grinding, keep the block close to the tip for best support.
 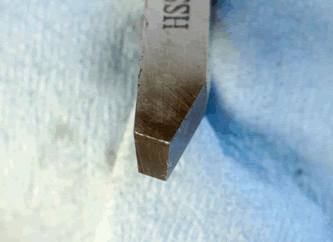 Again, note the dark straw color indicating the tool is cutting very easily without a lot of heat. This cut took about 10 seconds.
The last face we need to cut is the top. I have added an auxiliary table to provide support for the tool on the right side of the belt. The belt is tracked to the right so it overhangs the platen about 1/16â€; this is to prevent cutting the belt and creates a smooth fillet in the back rake as we cut into the steel. The table angle is still at 15 degrees. 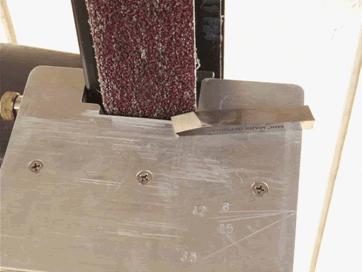 Below the tool in the picture above you can see some scribe lines on the right side of the table with different angles; these angles help me set the back rake. I align the tool to the 15 degree line and bring the tool to the belt without changing the angle. As the tool is fed straight into the belt it will begin cutting the side of the tool closest to the table. As the cut progresses it cuts closer and closer to the side cutting edge, which is presently on top of the tool; I stop just as the cut reaches the top edge. The result is a 15 degree side rake and a 15 degree back rake.
Remember to use the wood block to apply steady but only moderate pressure so the belt cuts continuously, while controlling/maintaining the back rake angle with the other hand. It’s easier than it looks – just a straight push into the belt. When done correctly the tip of the tool will be at the same height as the shank of the tool. 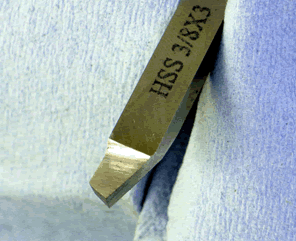 The above photo shows the finished top surface. I checked the progress of the cut 4 times. When resuming grinding just align the top edge of the tool so it is parallel to the belt and you won’t produce facets. Grinding time for the top was about 90 seconds so total grinding time for the entire tool is under 4 minutes. This is typical. Cobalt tools usually take a minute longer, while a ¼†square tool takes 2 minutes less.
If you add a nose radius you can use the tool as it is. If you hone it with a diamond or Arkansas stone it will cut better and last longer. I usually cut the nose radius manually with a diamond stone rather than use the belt. I find I can control the radius better this way. If you choose to grind the radius use a fine grit belt and angle the table to match the angle at the tip of the tool. Blend the radius smoothly with the side and end faces.
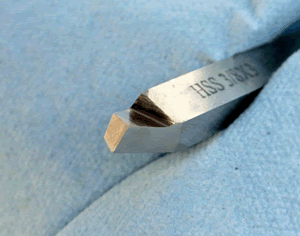 | Here the nose radius has been formed and the tool has been honed briefly with a diamond stone. The flat tool faces make it easy to hone the tool quickly. |
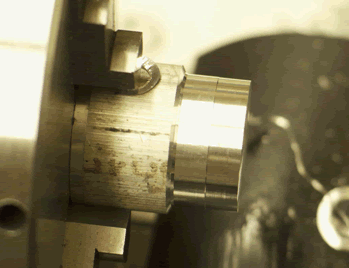
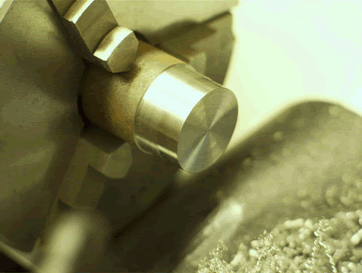
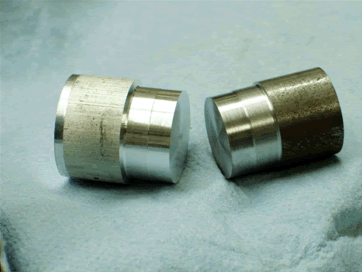
Now, let’s see if this tool will cut:
End Notes:
Our general purpose tool works reasonably well, at least in mild steel and aluminum. It would work even better if the angles were optimized for each material but even with the compromises we made it is certainly better than standard geometry tooling on a hobby-class lathe. I hope this point is made well enough to convince the new guy that learning to grind a tool is a skill worthy of his time.
I would encourage you to experiment with your angle changes until you find what works best for your lathe. The 25-40% modification range is conservative but works well for me. You will need to find what works for you. When experimenting I suggest using cheap import blanks and keep careful notes on what you did and how it worked. When you are happy with your results then grind a good tool from a blank you trust. Keep your notes so you can refer to them to either regrind the tool or reproduce it. I also suggest grinding material-specific tools instead of general purpose tools; they work so much better and require far fewer compromises.
With that said, I have found the following to work well in my shop:
- For all roughing tools and tools meant for most steels, it is better to keep relief angles conservative, from baseline to 25% above baseline, and boost side rake into the 30-40% range. This reduces cutting forces but preserves edge and tip strength because the edge is better supported. Side rake above 40% does not seem to provide greater advantage for steel; in fact, edge life falls off so cutting forces may increase.
- For finishing tools I tend to go 30-40% above baseline on relief angles because this really helps the finish. I keep side rake down in the 25-30% range to keep strength reasonable. I use a nose radius just a bit bigger than 1/64â€; this is enough for a mirror finish on most materials. I also increase back rake for finishers into the 30% range – this focuses the cutting forces at the very tip, which is okay since finishers are used with very shallow cuts.
- The only facing tools I use are Knife tools, described below. I have one for hard stuff and one for softer stuff and they work superbly. Keep relief and back rake angles in the baseline-25% range but boost side rake into the 25-40% range. Since facing tools cut with the side edge we need more strength at the edge and conservative relief angles do this.
- Brass likes an increased relief angle in the 30-40% range. Hone your brass tools and keep them very sharp.
- Delrin likes 30-40% relief angles and a large side rake (in the 40-50% range) to increase chip clearance and keep cutting temps down. Use lower speeds and higher feeds and keep your tools razor sharp. Your aluminum-cutting tools will also work well with Delrin.
- Stainless steel likes fairly aggressive (30%) relief angles. Side rake can be more conservative (25%). The important thing with SS is not to allow it to work-harden; keep your tool cutting continuously and it will work great with stainless. Use a lot of cutting fluid.
- Tool steels and semi-hardened steels cut best with baseline relief angles and side rake in the 30% over baseline range. This keeps edge strength up and cutting temps down. Cutting speeds matter here; rough slow and finish fast. If you get it right the metal will sizzle as it comes off.
Manual skills take time to develop so I suggest you stick with mild steel key stock until you are confident in your grasp of the content here. Give it some thought and see if you can grind a tool with the exact angles and shape you intend; then slap it on the lathe and cut something with it. It won’t hold an edge long but it will cut.  When you can grind a tool easily in mild steel then go to HSS. When HSS works out, try cobalt.
Cobalt is good for tools used on abrasive or harder materials that cut at higher temperatures – tool steels and semi-hardened steels, primarily. I also prefer cobalt for the tools I use most often such as the Knife Tool described below, as it holds an edge longer. Cobalt takes more time to cut so don’t rush the grind. HSS will work fine in most cases, however, and cobalt on a hobby lathe is not absolutely necessary.
Since a tool can last a lifetime if honed and cared for, I suggest using the finest tool bits you can find. My personal choice are Cleveland bits, all made in the USA (not Mexico), in both HSS and Cobalt. Other US makers produce good bits also. Import bits vary in quality so it’s hard to judge them; they do work okay but don’t seem to hold an edge as well. Poland and Japan make some good ones, though. If you hone your tools before storing them and before critical cuts you won’t need to regrind them very often, if at all.
When you are happy with the tools you grind you may wish to do a head-to-head comparison with your standard tooling. My expensive carbide turning tools sit in a drawer as a result of such a test.
I should mention belts and grits. I use a 24-grit Aluminum Oxide belt for shaping and usually step up to an 80 grit belt for smoothing before I hone on a fine, then an extra-fine diamond stone. When I want a polished tool, such as a fine finisher, I will step up from 80 to 120, then 220, 320, 400, then 600. The 600 grit will put a mirror finish on the tool. I then use a Translucent Arkansas stone to final polish the tool. To be honest, I rarely grind a tool to a mirror finish any more unless I need the finest finish possible. Honing works fine in most cases and takes only a few minutes.
Finally, let me share the Knife Tool with you. Popularized by Ian Bradley of the UK, it is a superior facing tool and will cut to a shoulder better than the standard facing tool shape. It is also my thin work finisher. The nose radius is very small but is there. Due to its shape it is very stiff. When used with a slightly negative lead angle it cuts shoulders and faces cleanly and without chatter in all materials. If you grind a small (1/32†wide) flat at the tip instead of a radius it will finish surprisingly well. The tool angles given below are for a general purpose knife tool.
Grind a 15 degree side and end relief angle, a 15 degree side rake angle and use about 10 degrees of back rake. Note that the side cutting edge angle is zero so you approach the belt with the tool bit parallel to the platen and stop grinding when the cut reaches the top of the tool. The end cutting edge angle is 65-70 degrees. Keep the nose radius small so you can cut fairly sharp corners in the shoulder. If you need to cut a shoulder very sharply then omit the nose radius. Remember this is a finishing tool so hone it after grinding.
If you understood this description of how to grind this tool then you understand what you need to know to grind any other lathe tool – Congratulations!
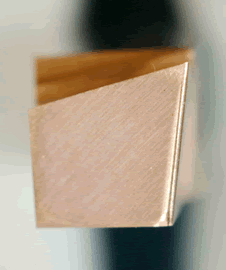 | 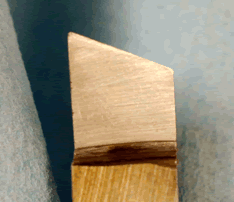 | 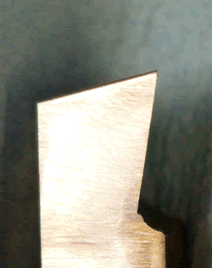 |
This 11-year-old cobalt knife tool is one of my favorite tools. When used with a slightly negative lead angle it can take whisper thin sizing cuts off a thin work piece or give you a mirror-finished facing cut. Honed after every use and before critical cuts, it has seen the grinder only on the day it was made. Try one – you will like it!
I hope this helps you grind a good tool and enhances your enjoyment of this great hobby.
Best regards,
Mikey
July 2009
Got here from the Make Magazine blog article. You have set a whole new group of gears spinning in my head…
You mentioned using wax stick lubricant on the belt. I searched around but couldn’t find any information on how to do this. Do you just apply the lubricant to the belt as it runs? Or to the tool stock before you start grinding (like you would with cutting oil)? How much do you put on?
Thanks!
Harley
Hi Harley,
Yes, you just push the stick wax into the running belt and it will stick to the belt. I put enough on to see it go on – a few seconds of application. Hope that helps.
Mikey
Hi Mikey
I am not sure what you mean when you say ” Rougher – take off 40% of the side , Facer – 70% of the side , etc. Could you explain? Thanks again for your help
Ken
Hey Ken,
I was referring to the amount you take off the side of the tool bit when grinding the side cutting edge angle. One way to visualize this is to put some layout dye or ink from a Sharpie on the top of an unground tool bit. Mark off the width of the bit with 10 even divisions. For a rougher you are going to grind off the side of the tool bit until you grind up to that 4/10th mark and then you stop grinding; you now have 60% of the tool’s width remaining, right? This side grind tapers from the very front so that it goes from 40% at the tip to zero about 1/2-5/8″ back from the tip.
So, you are holding the tool bit at an angle such that the tail of the bit is closer to you than the front of the bit; this creates that angled grind I referred to above.
Keep in mind that tools are shaped the way they are because they were originally intended to be used with the shank of the tool help perpendicular to the work piece. This 40% thing produces a lead angle that allows a deeper cut without inducing chatter. However, for a finishing tool we want a larger lead angle to produce a cleaner finish. Taking 70% off the width of the tool at the tip gives us that sharper angle while still allowing us to keep the shank of the tool perpendicular to the work. This greater amount of lead angle puts more of the side cutting edge into contact with the work so we have to take lighter cuts but it produces a much nicer finish.
I hope that clears it up for you. If not, try to explain what the point of confusion is and I will do what I can to clarify it.
Mikey
Hi, thanks for your informative articles. I am starting machining with brass and I am lead to believe that zero rake is appropriate for these on the mini lathe?
Your statement below seems to contradict that –
“Brass likes an increased relief angle in the 30-40% range. Hone your brass tools and keep them very sharp.”
Hi Roger, welcome to the site and to hobby machining!
You are correct – brass cuts beautifully with zero rake (flat on top) tooling. What I was referring to are the relief angles under the cutting edge. Unlike tools for steels and harder materials, brass cutters work better with higher relief angles that allow for a sharper cutting edge and a very nice finish. These tools also work better with a fairly generous nose radius – 1/32″ should work great. Hone your brass cutters and keep them sharp and you’ll turn brass like a pro!
Hope that clears it up for you. If not, let me know.
Mikey
NIGEL ALLEN
February 4, 2015 at 3:03 AM | Reply
Dear Mikey, My query relates to your article on rebuilding a Albrecht drill chuck. Following your advice I have stripped my Metabo similar chuck. I find that the spindle and body are seized together and in spite of my efforts to undo the left hand thread they will not come apart. I have held the jaw end of the spindle in a Schaublin collet in my lathe tightened very securely but as both parts are hardened they just slip. I have used moderate heat and penetrating oil without succ0ess. I am tempted to assemble the spindle with the chuck jaws in place in the jaw guide and hold the guide on its outsider diameter on a fixture I, will make and use the three jaw engagement to give me a fully supported method to hold the spindle but feel this is a last resort effort. Can you confirm that these two parts must be threaded with a left hand thread as otherwise I cannot see how the chuck operates and do you have any suggestions that might help? I have asked Metabo for a diagram of the chuck and suggestions but have had no response so far! Excuse me using this article web site but I cannot recall your original article on the Machinist site. Kindest Regards, NIGEL ALLEN 3.2.2015
Original article: https://www.machinistblog.com/rebuilding-an-albrecht-drill-chuck/
(your email address above was removed to prevent spam)