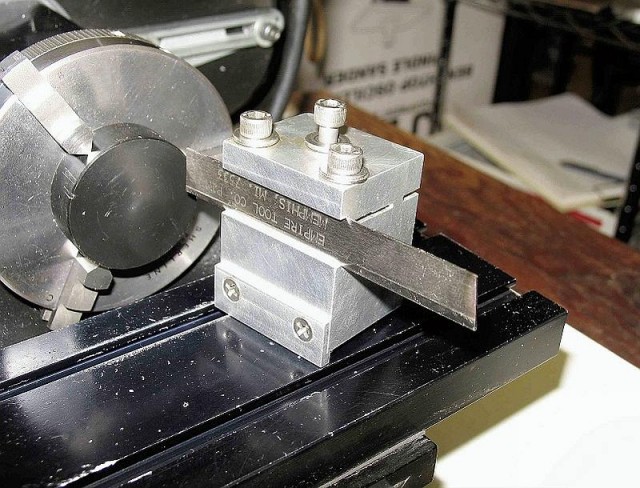
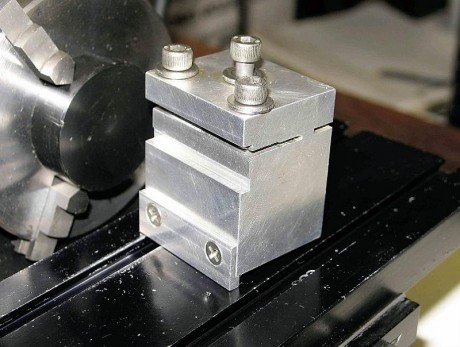
 This is the rear-mounted parting tool holder for my Sherline lathe. It’s based on a design that’s been around for decades and I made it about 12 years ago, before Sherline offered one for sale. It is just a block of 6061-T6 aluminum and it cost almost nothing to make. Further on you’ll find drawings that will help you make your own. The design could probably be adapted for 7×10/12 mini-lathes, which are notoriously bad at parting-off.
Yeah, I know its beat up and ugly but it is extremely solid and functions perfectly. As you know, a rear mounted parting tool pushes the carriage down instead of raising it up so rigidity is markedly enhanced. My parting tool does not chatter, dig in, or deflect. It cuts cleanly in all materials I have used it on, at speeds averaging 2-3 times normal turning speeds.
The main features of the tool holder are
- It accepts all 1/2-inch tall P-type blades, mounted upside down.
- The bottom of the slot is on the exact centerline of my particular lathe. This allows the tool to be extended however far I need while still remaining at centerline. Canted designs do not do this. The Sherline OEM tool holder may not be on the centerline either so a shop-made one is a better option.
- There is a ledge on the bottom of the tool holder that automatically aligns the tool perpendicular to the work. A single screw locks the tool to the carriage in a few seconds. The ledge eliminates the possibility of movement, even under very heavy loads.
Inverting the parting tool does several things
- Improves geometry. Instead of being a zero-rake cutter an inverted tool has back rake, which assumes the importance
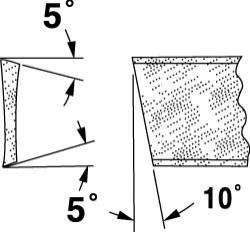 of side rake on a turning tool. This not only reduces cutting forces but also greatly improves chip ejection from the cut and thereby also reduces cutting temperatures. Furthermore, the 5-degree side rake on a P-type tool also narrows the chip, improving chip ejection even more.
- Improved oiling. On an upright parting tool the chips are piling up on top of the blade and carry much of the cutting fluid away before it even gets to the tip. With an inverted tool the oil gets to the tip first, further reducing cutting temperatures and improving both accuracy and finishes because the cut is no longer dry.
So, you have greatly increased rigidity, reduced cutting forces and cutting temperatures, improved oiling, and the ability to cut at higher speeds that leads to improved accuracy and finishes. With all of this I cannot imagine why a guy wouldn’t rear-mount a parting tool!
I also believe the improved geometry allows a blade to cut a larger work piece than expected. A P1N blade is usually used for work up to 3/4-inch OD but I use mine on work up to 1-1/2-inch OD, double what you would expect to be able to cut. I do alter the angle at the nose of the tool; I use 7 degrees instead of 5 or 10. I have found edge life to be greatly improved, while still clearing chips easily.
Here is an example of a cut made in 12L14 mild steel. The OD is 1-1/4-inch at the cut. Depth of the grooving cut is 5/16-inch and I made two cuts side by side to allow my turning tool to fit in there. Speed is 1200 RPM and I purposely extended the blade about 5 times more than needed for this depth of cut to see if I could induce chatter – there was none – note the finish inside the groove. This part was later parted off about an inch from the chuck at the same speed and came off cleanly. I assure you that I cut like this all the time, in all sorts of materials.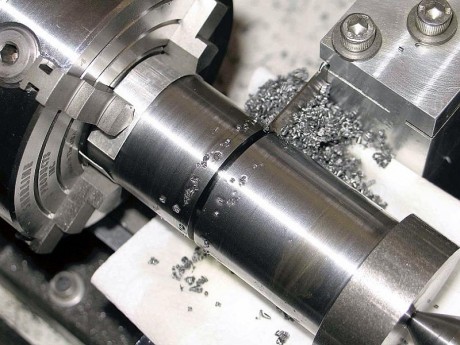 I set cutting speeds based on how the feed feels. The tool should cut freely and easily but allow me to feel the tip in contact with the work while feeding at a pace I can keep up with comfortably. Because the tool cuts so well there is little fear of digging in or chattering so speeds and feeds are much higher than you would expect.
 I do not own an Asian lathe so do not know if there is a way to mount a tool holder on the rear of the carriage. If I owned one I would drill and tap a hole to accept it, though. I would also find a way to fit a ledge at the edge of the tool holder so the blade is always perpendicular to the axis of the lathe.
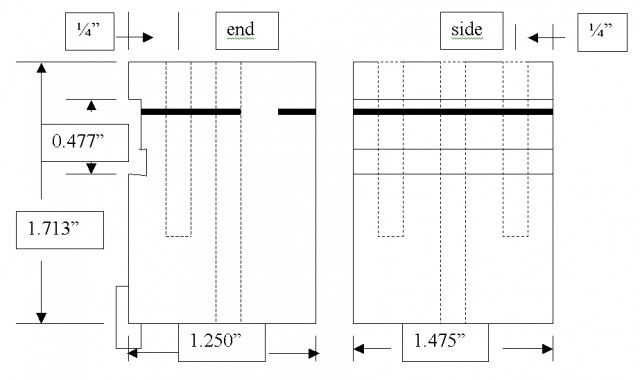
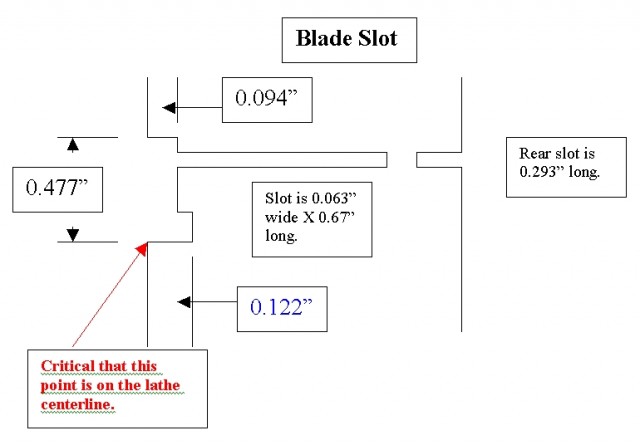
Here is a drawing of my post, not to scale. The critical dimension is the distance from the bottom of the tool post to the bottom of the blade slot; this must be exactly on your lathe centerline.
A few things to note
- The overall dimensions are not critical. Note that P-type blades typically are somewhere around 0.475-inches tall so the blade slot just needs to clear this.
- The depth of the recess to clear the cutting portion of the blade is sized to allow any 1/2-inch tall P-type blade to fit, while the rest of the slot above it is meant to support the body of the blade.
- The slot width and depth are not critical. I used a 0.063-inch slitting saw (and my band saw to go a little deeper).
Here are the typically available cut-off blades
Model No.  Width x Height x Length
PIN  .04 x 1/2 x 3-1/2
P1  1/16 x 1/2 x 4-1/2
P2  5/64 x 1/2 x 4-1/2
P2  3/32 x 1/2 x 4-1/2
P3  1/8 x 1/2 x 4-1/2
– Mikey
Thanks for the post Mikey!
I recently found a deal on a used Sherline that was too good to pass up. I quickly realized I couldn’t afford all the accessories I wanted, so I’d have to make them.
I used your plan with the 1 1/2 stock I had already picked up for making tool holders. It works fine, although I’ve yet to try and push the limits as much as you have.
The P1N cutter I purchased ended up being very close to 1/2″ (.498), so it’s a good thing I waited until I got the blade before I cut the slot!
thanks again,
andy
Glad you found it useful, Andy. Once you are used to how it likes to cut, parting off becomes a routine operation. Good luck with your new lathe!
Mikey
How do cut the grooves or slots on the block?
I meant: how do you cut
I used a slitting saw.
Do you have one to sell?
I mean a Rear-mounted Parting Tool Holder for Sherline Lathe.
No, I don’t. The idea of the article was to include enough detail for you to make your own. If you own a milling machine this is a very simple project for the hobby guy.
Thanks for the post and the sketch. What is the purpose of the outrigger on the bottom? Does it keep the tool locked into alignment with the workpiece (i.e.-keep the tool post from rotating/turning) ?
Are you referring to the ledge? If so, yes, it prevents the tool from turning under load. It also automatically puts the blade perpendicular to the work piece. Since the blade tip is also aligned with the centerline of the lathe, all you have to do is lock the blade in place and you can start cutting.
If you own a Sherline lathe, this is one of the most useful tools you will own.