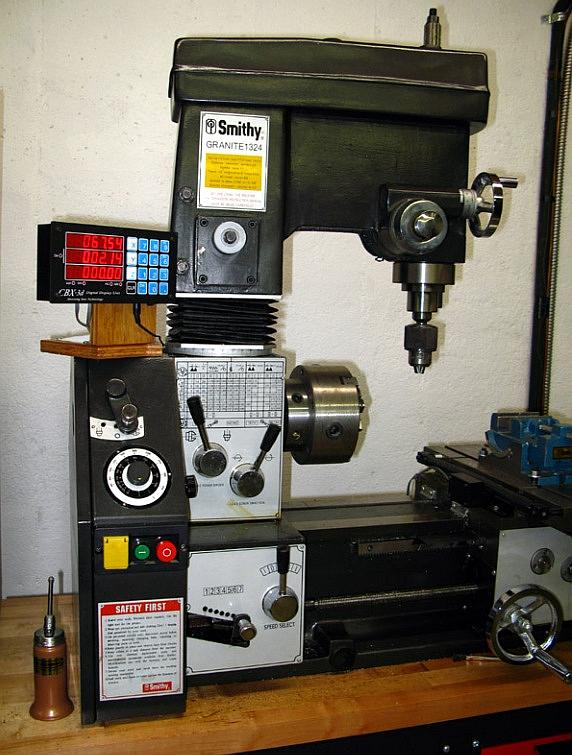
 New contributor Jay Bolyard did an outstanding job describing how to make this repair. — Rob, editor & chief floor sweeper.
This article describes how to replace the Smithy Granite 1324 Classic Combo Lathe-Mill-Drill’s ball bearings in its driven pulley. The bearing may have to be replaced if it makes a noise like the one described below.
If….
- Machine makes a bearing gone bad noise – you know it when you hear it – a zzZZzzZZzzZZ sound at low to medium speed – may not be able to distinguish the noise at higher speeds [Hear it in a .mp4 video]
- The noise occurs in all three drive modes: lathe, mill and neutral (occurring in neutral is the key)
- The noise occurs with and without the lead / feed gearing engaged
- The noise does not occur with the belt taken off
- The noise seems to come from the clutch and driven pulley area when machine is run with pulley box open
Then….
- The ball bearing inside the driven pulley or the clutch bearing in the shifter fork (or both) are likely in distress and the source of the noise
- They either need to be re-greased – or – since you’ve got it all apart – best to just replace them with permanently lubricated and shielded bearings
A few unique tools and a few supplies that are needed in completing this work
- 3″ and 6″ – 3 jaw gear pullers like those found in this set at Harbor Freight – They’ll do the job inexpensively.
- Large snap ring pliers – larger than most people have in their toolbox – must be capable of up to 4″ shaft – Like these found at Grainger Item 3JXL9 – Large Snap Ring Pliers at Grainger
- Propane torch
- 2-ft long 1/2″ threaded rod – with (3) matching hex nuts and (3) 1/2″ fender washers
- Grease – I used Amsoil Multipurpose Synthetic Grease
- Screwdrivers
- Needle Nose Pliers
- Wrenches
- Rags
- Parts schematics for reference
- Access to an arbor or shop press – A mallet could be used if great care was taken – your decision
- Approximately 5″ square and 2″ x 12″ pieces of wood – whatever is available – photos below show usage
Homemade or Hardware and Auto Parts store supplies
- 2.33-2.45″ ID x ( 21/4″ long tube or equivalent tooling pre-made with lathe for use in pressing off the old and on the new clutch bearing. (2″ Schedule 40 white PVC Drain Coupler – can be used instead – $1 at hardware store)
- 2.8-3.1″ OD ( 1/4″ thick plate or 2.8-3.1″ OD tube ( 11/2″ long or equivalent tooling pre-made with lathe for use in pressing out the old pulley bearing. (3″ ID to 3″ OD exhaust pipe adapter – can be used instead – $3 at auto parts store)
- Two #8 x 1″ long machine screws (or pins ~ 5/32″ dia)
- Two M5 x 0.8 bolts – at least 25mm long – easier if longer – suggest grinding/filing the tips smooth/flat to decrease face marking on the right coupler (G03-005)
- 3.80-3.90″ OD ( 1/4″ thick plate or 3.75-3.90″ OD tube ( 1″ long or equivalent tooling pre-made with lathe for use in pressing in the new pulley bearing – I made it on a friends lathe because mine was already apart… (3″ grey PVC Electrical Coupler came close to working – needed to turn about 0.1″ dia. off 1/2″ of one end)
New Bearings
- 1 – # 6011ZZ (2Z) – 55x90x18mm (Clutch Bearing). Minimum ABEC-3 with C3 clearance. Choose ZZ (double shielded) vs. original open/open design to avoid need to periodically grease and keep contamination out of the bearing. Cost depends on brand chosen – I chose Nachi-Japan.
- 1 – # 6013ZZ (2Z) – 65x100x18mm (Pulley Bearing). Minimum ABEC-3 with C3 clearance. Again, choose ZZ (double shielded) vs. original single shielded design to avoid need to periodically grease and keep contamination out of the bearing. Lack of good grease and the former machine owner keeping the belt tension engaged when not in use is likely what caused my bearing to fail. Again – I chose Nachi-Japan.
Disassembly
1) Unplug the machine and open the pulley box.
2) Loosen the setscrew on the collar (Smithy part number G04-007) of the lathe/mill selector arm (G04-008) and slide the selector arm away from the shifter fork (G03-090) enough to disengage and remove the fork. Keep a hand on the fork while pulling back the selector arm or it will likely fall to the floor.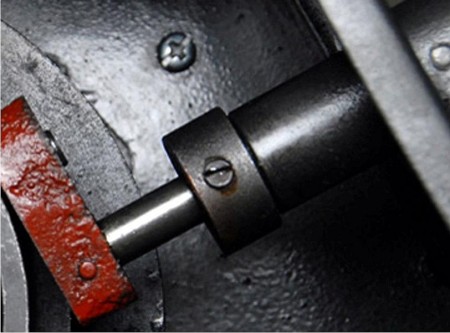 3) Release the tension on the drive belt with the lever above the motor at the back and remove the belt. Tension should not be left engaged when the machine is not in use. Over time, bearing races left under static load may become indented by the balls or the balls get flat spots.
4) Remove Phillips locking screw (G03-008) from locknut (G03-009).
5) Insert two pins or #8 machine screws into two opposing of the four holes in the face of locknut (G03-009). Use a screwdriver as a lever to loosen the locknut using the two pins as drivers. The locknut loosens by turning in the typical counterclockwise direction. Keep the screwdriver as close to the nut as possible to avoid unnecessary ovalizing of the holes. (Ref: Photo in Step 34). It may be necessary to block the spindle from rotating using a piece of wood locked in the lathe chuck.
6) Remove the left coupler (G03-010). This may not slide off easily by hand and the 3″ small 3-jaw puller comes in handy. Place a few washers or other flat plate on the end of the spindle (G03-045) to push against. Note orientation – castle fingers point inboard.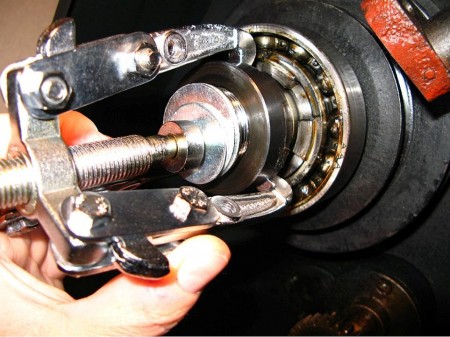 7) Remove the small oval key (G03-016) with pliers.
8) Remove spacer (G03-089). The spacer should slide off by hand. Note orientation – partial keyway faces outboard.
9) Remove the center coupler (G03-012). The clutch bearing (G03-090) and snap ring (G03-088) will remain attached to the center coupler. We’ll address taking apart this assembly later in Steps 18-19 to replace the clutch bearing if choosing to do so.
10) Remove the sleeve (G03-004). The sleeve should slide off by hand. Note that the inboard/spindle end of the sleeve has a step on the ID (Inner Diameter) while the outboard end does not.
11) Remove or significantly loosen the setscrews (G03-018) that are installed radially into pulley (G03-021) and hold coupler sleeve (G03-017) in place.
12) Screw the two M5 x 0.8 x = 25 mm bolts into the holes in the face of the coupler sleeve (G03-017) until they bottom out.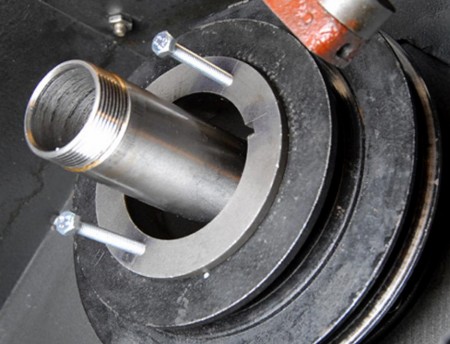 13) Begin screwing the two bolts in – each an equal amount – alternating. If the sleeve does not begin to move when applying a moderate torque for this size bolt, use a propane torch and apply a small amount of heat to the face of the pulley (G0-021). Do not heat significantly – just warm. Then begin torquing again. This will push the sleeve out of the center of the pulley. Note: the sleeve has both an inner and outer key (G03-016 and G03-018). Be sure they stay in place.
14) Remove the snap ring (G0-024) – it’s large and requires a larger than common pair of snap ring pliers as described above.
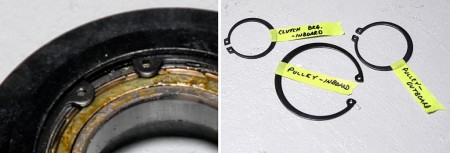
15) Use a 6″ 3-jaw gear puller to gently ease the pulley (G03-021) off the shaft. Again, place a few washers or other flat plate on the end of the spindle (G03-045) to push against.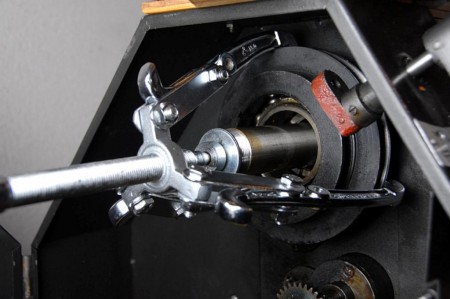 16) Remove the 100mm internal snap ring (G03-001). This ring is large enough that a regular set of thin needle nose pliers can be used if sufficient internal snap ring pliers are not available. Insert the tips of the pliers’s jaws into the ring tip holes – squeeze to compress and remove. At this point – it’s probably a good idea to label the snap rings… and organize the smaller pieces…
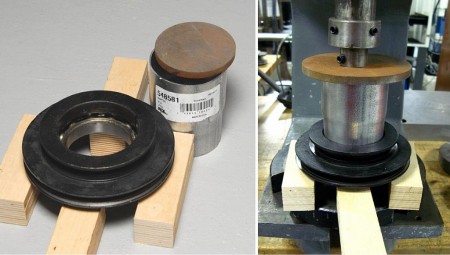
 17) Using an arbor or shop press, press the bearing out of the pulley from the outboard side toward the inboard side by placing the homemade tool or exhaust adapter described above. Push against the inner race. It is generally undesirable to push against the race which is not holding the press fit and transfer large static load through the balls, but since the bearing will be replaced it is of no consequence. You won’t need to do this during installation of the new bearing. You will need to support the pulley so that there is clearance for the bearing to come all the way out (wood strips in photo below).
 18) If choosing to replace the clutch bearing, remove the external snap ring (G03-088) from the center coupler (G03-012) assembly using the same large snap ring pliers as in Step 14.
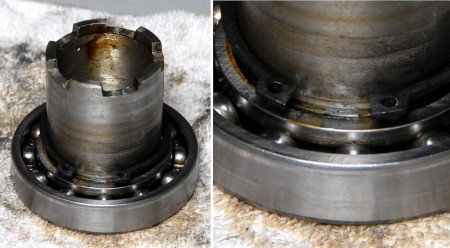 19) Press the clutch bearing (G03-090) off the center coupler (G03-012) from the outboard to inboard side by placing the homemade tool or 2″ PVC tube described above from the opposite side relative to photo above. Pressing on the inner race is the desired method in this case. The old bearing was a press fit the entire length of the coupler so I needed to press till the bearing was flush to the table and then flip the assembly with the PVC tube over and push a little more on the coupler itself. After cleaning and with a new bearing the press was only below the snap ring groove as it should be.
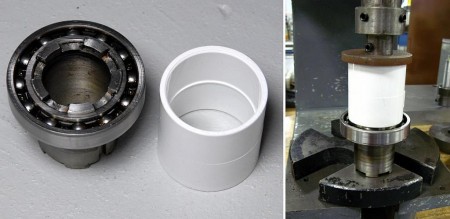 Note: If you use the PVC coupler as shown here – take the time to rat-tail file out the ridge inside at the center to save wondering about a bit of extra force as the castle tips broach their way past it. (Lesson learned)
20) Next step – cleaning. Clean up all the old hardened grease off all the parts. Soak the old bearings in kerosene to dissolve old grease – might take a day or two. Once the bearings are completely free of old grease, good ones will spin very freely with a quiet single tone hissssss sound and no vibration discernible in your hand. Anything else – bad bearing – definitely replace.
21) While the pulley box is apart, clean everything in there all up too and re-grease per instruction manual.
Assembly
22) Press the new bearings in place. A very light coating of grease on the pulley bore and the coupler outside diameter between the castle and the snap ring groove is a good idea to make the press go smoothly. Here’s what they look like reassembled with the new bearings. Press on outer race for larger pulley bearing and inner race for smaller clutch bearing.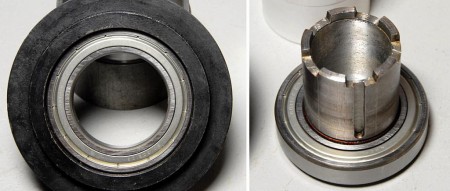 23) Replace the internal snap ring on the inboard side of the pulley from Step 16 and the external snap ring inboard of the bearing on the coupler from Step 18. I had to use those two #8 machine screws again – this time inserted in the holes in the internal snap ring tips for compress and install – for some reason the plain needle nose method mentioned in Step 16 would not keep hold of the ring and work in reverse.
24) Put a very thin coat of grease on the pulley seat (G03-003). Set the pulley assembly in place and begin pressing onto the seat by hand to align.
25) Insert the 2 ft threaded rod through the spindle and lock into the jaws of the chuck. Use a piece of wood between two nuts and fender washers at the chuck end to prevent rotation and provide opposition to pull against. Use a piece of wood and the device previously used for pressing the pulley bearing in place to assemble a method to press the pulley assembly onto its seat. Place the third nut and washer onto the threaded rod at the pulley end. Easier to see in photos than to describe. Wrench the pulley end nut until the pulley is bottomed out on the pulley seat.
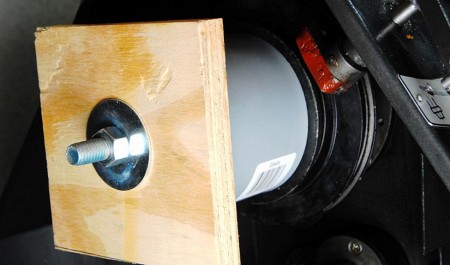 26) Replace the snap ring from Step 14. Important tip here – insert the ring into the pulley loosely such that the tips of the ring are past the bore where the coupler sleeve (G03-017) presses in prior to attempting to expand the ring with the large snap ring pliers. Otherwise, the ring tips will not fit past the bore and over the pulley seat OD (Outer Diameter) simultaneously. (Another lesson learned … the hard way)
27) Line up the coupler sleeve OD key with the ID keyway on the pulley and begin pushing in by hand. Rotate the pulley continuously while tapping the coupler sleeve with the handle of a screwdriver or small mallet. Patience is important. The sound of the tapping will change when you have fully seated the coupler sleeve.
28) Tighten the set screws equally and just snug. Ensure the pulley rotates freely – on my machine, if I torqued the set screws more than just snug the pulley became somewhat tight to rotate.
29) Lightly grease the inside of sleeve (G03-004) and slide onto the spindle. Remember the slight ID step is on the inboard end.
30) Grease inside the center coupler assembly and the inboard coupler castle tips – slide the center coupler assembly over the sleeve and engage the ID key in the coupler sleeve. Rotate and slide all the way in as if the machine was in milling mode. Photo below shows Step 29 and 30 completed.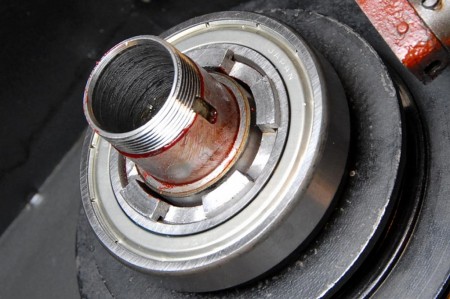 31) Reinstall spacer (G03-089). Note orientation – partial keyway faces outboard and lines up with keyway on spindle.
32) Install the small oval key (G03-016) into the keyway on the spindle. See photo – spacer and key installed.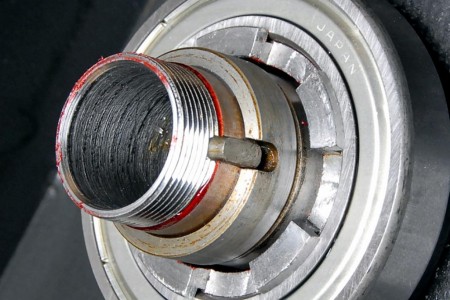 33) Grease castle tips and edges on left coupler (G03-010) and on outboard end of center coupler. Line up key and keyway. Press onto end of spindle – tap in place until bottomed out on the spacer.
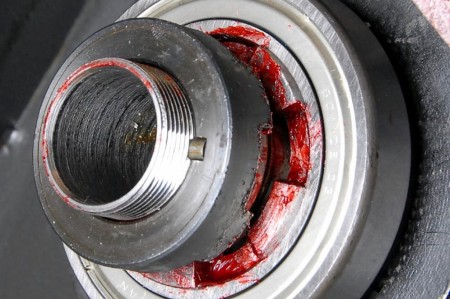 34) Clean any grease off spindle end threads and screw locknut (G03-009) back onto end of spindle by hand. Insert the two #8 machine screws again in two opposing of the four holes in the face of the locknut. Use a screwdriver as a lever to tighten the locknut using the two screws as drive pins.
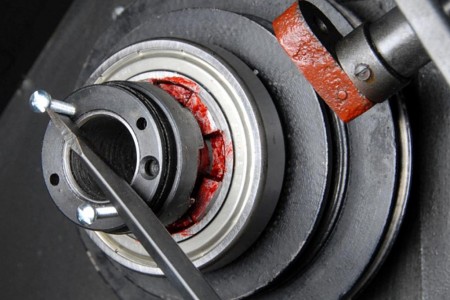 35) Insert and tighten Phillips locking screw (G03-008) into locknut (G03-009).
36) Reinstall belt and tension with motor lever. Test at this point if you wish to confirm the noise is gone… nice and quiet.
37) Install shifter fork (G03-090) onto clutch bearing and engage the lathe/mill selector arm (G04-008).
38) Slide the collar (G04-007) up against the boss on the pulley box and tighten the setscrew. DONE!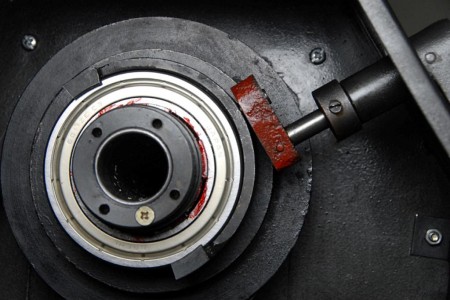
A really amazing article. I’m in the process of reworking a 1324 that I inherited from job.
This is very helpful!!
Thank You,
Scott
Well done!